Wednesday, July 13, 2011

Miniapplicious Pies


Yesterday was my last day of freedom this summer.  I got hurt last month and had stress fractures in my leg from running.  I ended up not being able to walk on it and was off for almost a month.  During the down time of my “Summer Vacation” I found a amazingly spectacular, so much better, real, new job.  So yesterday was sort of a last hoorah.  I kept the girls home from school, we went grocery shopping, they helped put away all the groceries, we watched a movie while I folded clothes, then they helped put them all away, had lunch with Daddy, went to the pool, and while this was happening….


I made these….


I got the idea from Our Best Bites’ Star-Studded Mini Pies.  While mine didn’t turn out the same, or even close to the beautiful edible goodies they made, mine were still very good.  Especially since I used premade piecrusts and filling.  I needed something quick and easy while they were sleeping.  I may go all out one day and do it from scratch, but for only taking about 15 minutes to make they were pretty darned good!


I rolled out the piecrusts and used my tomato storage tomato for a cutter.  My cup mouths were too small and bowls were too big, and it was the first thing I could grab, so it served double duty today.


Then I pinched the sides together a bit and put them inside the wrappers.  You don’t have to use cupcake wrappers but I did for two reasons. 1.  I didn’t want to dig or dump out the pies and the papers make it very easy to pull out. And 2.  I was thinking that if we were eating them outside or somewhere other than the kitchen it would be easier to hold and they would be more portable.  They papers come off very easily and nothing stuck.


To make the tops I had to mush it all together and re-roll it.  I would have liked to have a creative top like a heart or a star or something creative, but when I went to get out my cookie cutters I had a whale, a giraffe, a duck, a candle, and other odds and ends.  So the diamond was my best bet.


I coated the diamonds in sugar just by pressing them into some granulated sugar (which was in the other half of my tomato storage tomato).  I didn’t coat them in melted butter just to save some calories.  They turned out just fine without it.


This is where the girls woke up.  They watched me finish putting the apples in them and wanted to eat the filling out of the can.  I filled them pretty full because it was more apple slice than filling so there wasn't much to bubble over.  If I were to use something like cherries or blueberries I wouldn't put as much in them because it would bubble over easily.  The girls didn’t want to even touch the pies when they were done.  Means more for me and the fiance though. :) They love making things and watching them be made, but they don’t always want to eat it.


I cooked them according to the directions on the crust box at 425 and they came out with very brown tips.  Next time I will cook it on a lower temperature, probably around 350. Over all it was quick and easy and definitely something we can play around with until we find our perfect pie.

Tuesday, July 12, 2011

Free Bag of Salad!


Vocalpoint is a great website that allows mothers to share their opinions and really be heard about products, ideas, and organizations that are happening around them.  They offer a chance to complete short, and I really do mean short, surveys and participate in focus groups.  They're very easy to connect with, and have quite a few amazing offers for their members.  The most recent one is a FREE bag of salad from Fresh Rinse.  Fresh Express® has developed a breakthrough, eco-friendly produce wash called Fresh Rinse that is 7x more effective in cleaning salads than traditional chlorine wash, but is still gentle on lettuce.  It's also environmentally friendly and acceptable for use on organic produce.  

Visit Vocalpoint HERE to sign up for your FREE bag of lettuce and bag clip while they're still available and then write back and let me know what you think.  


*This is not a sponsored post in any way, just sharing some free healthy food.

Monday, July 11, 2011

Menu Plan Monday (June 11th)


So I will have to say that I am pretty proud of myself today.  I went to the grocery store this morning without a formal list, which has the potential to be very dangerous, but it went very well.  When I got home and got everything put away I had to move the groceries around groceries I know we've had for a while.  So out of frustration I cut index cards into thirds and wrote down every type of meat, side dish, and desert I had.  Then I went through my sauces and seasoning mixes and wrote down all the potential meals we had.  After writing everything down I laid them out in the floor and matched sides with meats and created a menu for the next three weeks.  I made a new list for a few things I need to complete a few meals and then hopefully we will be able to diminish the food we have in the house and then start over. :D  So here is my Menu Plan Monday for the next few weeks.


Monday, July 11
Pot roast w/ Veggies, Canned Fruit
Tuesday, July 12
Mini Pies, Grilled Pork Chops-Marinaded, Baked Yams with Marshmallows
Wednesday, July 13
Mini Pies, Italian Herbed Chicken in the Slow cooker, Collard Greens
Thursday, July 14
Canned Fruit, Grilled Fish-Marinated, Crab Cakes and Coleslaw
Friday, July 15
Canned Fruit, Sloppy Joes, Baked Beans and Mac&Cheese
Saturday, July 16
Canned Fruit, Beef Stew, Tomatoes, Okra, and Corn
Sunday, July 17
Lunch and Dinner Party (NO COOKING!!)
Monday, July 18
Chicken & Veggies (bag n' season), Sugar Cookies
Tuesday, July 19
Hot Dogs, Baked Beans, & Chips, Sugar Cookies
Wednesday, July 20
Canned Fruit, Spaghetti & Asparagus
Thursday, July 21
Salmon Patties & Frozen Veggies, Chocolate Cake
Friday, July 22
Chicken Tacos, Guacamole, Chocolate Cake
Saturday, July 23
Sloppy Joes, Chocolate Cake
Sunday, July 24
Pork Shoulder Roast, Peas, Canned Fruit
Monday, July 25
Canned Fruit, Beef Tacos, Taco Rice
Tuesday, July 26
Tuna Salad, Hominy, Canned Fruit
Wednesday, July 27
Canned Fruit, Meatloaf, Corn
Thursday, July 28
Chili and Crackers
Friday, July 29
Teriyaki Chicken, Rice
Saturday, July 30
Beef Roast, Pasta Salad
Sunday, July 31
Chicken w/ Fried Onions, Corn
Monday, August 1
Beef Stew, Green Bean Casserole
Tuesday, August 2
Orange Ginger Chicken, Frozen Veggies
Wednesday, August 3
Sloppy Joes, Hominy
Thursday, August 4
Cajun Alfredo Skillet (I'm excited to try this one!  All the Kraft recipes I've tried have been great so far)


I'm not making too many side dishes with these recipes so that I can reheat leftovers and use it all so we don't waste a lot of food.  I'm also going to be saving things that are easy to reheat for my fiancĂ©’s lunch.  My lunches are now catered by a Master Chef. ;)  No seriously, they are.  Since I have developed a major sweet tooth I also want to start making jello with fruit in it so it's less fattening than other options that I tend to go for in late at night.


Sunday, July 10, 2011

Baked Crayons


I know it's all over the place, but baking crayons is so much better than having the girls pick up little bits and pieces of crayons every time they decide to color.  But I also learned there is a bit of a process that goes with it.  It begins with this...


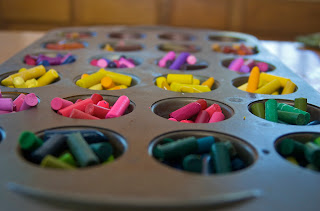
Then we took a break at the pool.  Then sorted all the crayons into big color groups, but I didn’t want them to be so big that they were hard to actually color with.  So we divided them into smaller groups in my baby cupcake pan.


Letting the girls watch them melt in the oven was fun, and that’s about when they lost interest.  After the first pan.   It takes a little bit of time to melt them because you only want to cook them @ 250 degrees for about then minutes. I also figured out that setting it in a pan of water to cool it off enough to stick it in the freezer helped a lot. If they don't pop out immediately I also found that GENTLY taking a hammer to the back side will help them along a bit too.


I think next time I will use liners to prevent it from sticking but I think the smooth edges are pretty.  It’s not too bad to clean up. I just threw the empty pan back in the oven then wiped out the little bits of melted wax out with a paper towel.


 And in the end, this is what we ended up with...

The brown and gold shiny one is my favorite.


 These are so much nicer to keep track of than all the little bitty peaces.


Will be linking at Today's Creative Blog, among others.